After the tiles come off: preparing bathroom walls properly
Sound walls, considered preparation and clear expectations for cost and timing.
Design & comfort · 5 min read
Design inspiration; preparation stages shown do not establish a completed waterproof installation.
A quality finish starts with the wall
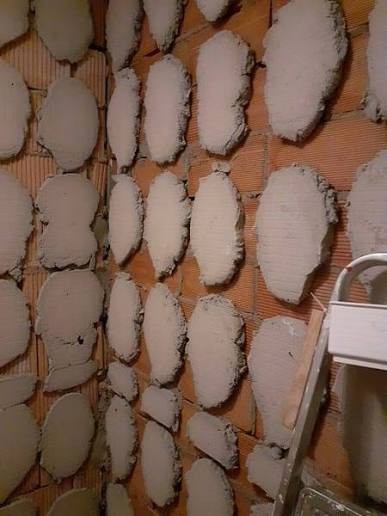
Once old tiles come off, the wall may reveal blobs of fixing mortar, damaged plaster or uneven masonry. Before the new finish goes on, we assess what is sound, what needs removing and how to create a suitable surface. Preparation influences the finish, cost and programme of your renovation.
The exposed backing
Assessed before anything is retained.
Enlarge ↗
1 / 1 · Design inspiration
Board systems
Suitable support, fixings and connections.
Enlarge ↗
1 / 4 · Design inspiration
Insulated boards
Preparation and thermal performance.
Enlarge ↗
1 / 1 · Design inspiration
Can the old mortar stay?
Sometimes suitable existing material can be retained and the wall regularised with a compatible product. The old material and the wall beneath it must be firmly attached, cohesive and suitable for the new system. Loose, crumbling or contaminated material needs treatment or removal.
Filling between old blobs is not an automatic shortcut. We check the material, absorption, required thickness and finished flatness. A new layer cannot make a failing backing reliable, and a primer is not a universal cure for weak material.
Remove and render
Removing unsuitable mortar exposes the underlying wall for assessment and repair. A suitable cement-based rendering or levelling system can then establish the required surface for waterproofing and tiling.
This can involve more dust, noise, rubble handling and wet work. The advantage is a fresh base and control over the wall geometry. Removal is worthwhile where needed, rather than something every wall automatically requires.
Prepare and board
A suitable board system can create a flat tile backing and avoid the waiting period of a full conventional render coat. The board, thickness, support and fixing method must suit the wall and tile load.
Some systems can bridge uneven masonry using specified new adhesive dabs and mechanical fixings into sound backing. That does not mean any board can simply be glued onto old mortar.
Boarding adds material and detailing costs, may reduce room dimensions and creates offcuts. Joints, corners, fixings and pipe penetrations still need the treatment required by the chosen waterproofing system. A board-lined wall is not automatically a completed waterproof shower.
Insulated boards and cold walls
Some tile-backer boards have an insulating foam core. Where appropriate, they can combine preparation with reduced heat loss through a cold external wall. Thickness and thermal performance matter: a thin backing board is not equivalent to a substantial insulation layer.
Internal insulation needs assessment of the wall construction, moisture and condensation risk, as well as junctions and lost space. It helps retain heat; it does not generate it or resolve the cause of damp. Suitable floor insulation can also support the performance of electric underfloor heating.
Why waiting times differ
Setting, drying and developing a stable backing are different stages. The next layer must only be applied when the specified conditions are met. Thickness, temperature, humidity and ventilation affect the programme.
Conventional cement/lime mortars need time to mature. Specially formulated rapid products can permit earlier work, but their instructions distinguish readiness for tiling from readiness for waterproofing. We follow the complete system rather than promising one drying time for every wall.
Boarding can reduce wet-render work, but adhesive, joint treatments and waterproofing still have their own waiting times. A harder-feeling surface is not proof that it is ready to cover.
Cost, waste and the agreed approach
Retaining suitable material may reduce demolition; removal and rendering may involve more rubble and labour; boarding may save waiting time but add materials and finishing details. None is always the cheapest or fastest overall.
At Morfohouse, we explain the proposed preparation, waste handling and timing within your complete bathroom renovation. Where stripping reveals unexpected damage, any additional work is discussed before proceeding.
Preparation, waterproofing and finish
Our approach is to create a sound, sufficiently flat and compatible backing before the decorative finish. The shower waterproofing is then detailed as a complete system, including corners and connections.
The relevant UNE guidance addresses stability, flatness, cohesion, moisture and compatibility. It does not provide blanket approval to fill between old mortar blobs or require one preparation method for every bathroom.
Después de retirar los azulejos: preparar bien las paredes
Paredes firmes, preparación cuidada y claridad sobre costes y plazos.
Diseño y comodidad · 5 min de lectura
Inspiración de diseño; las etapas mostradas no acreditan una impermeabilización terminada.
Un buen acabado empieza en la pared
Al retirar los azulejos pueden aparecer pegotes de mortero, yeso dañado o fábrica irregular. Antes de revestir de nuevo, estudiamos qué está firme, qué debe retirarse y cómo crear una superficie adecuada. La preparación influye en el acabado, coste y plazo de la reforma.
El soporte expuesto
Se comprueba antes de conservarlo.
Ampliar ↗
1 / 1 · Inspiración de diseño
Sistemas de placas
Apoyo, fijaciones y encuentros adecuados.
Ampliar ↗
1 / 4 · Inspiración de diseño
Placas con aislamiento
Preparación y prestaciones térmicas.
Ampliar ↗
1 / 1 · Inspiración de diseño
¿Se puede conservar el mortero antiguo?
En algunos casos se puede conservar material adecuado y regularizar con un producto compatible. Tanto el material como la pared deben estar bien adheridos, cohesionados y ser apropiados para el sistema. Las partes sueltas, disgregadas o contaminadas requieren tratamiento o retirada.
Rellenar entre pegotes no es un atajo automático. Comprobamos material, absorción, espesor y planeidad final. Una capa nueva no convierte un soporte que falla en uno fiable, ni una imprimación resuelve cualquier debilidad.
Retirar y enfoscar
Eliminar el mortero inadecuado permite revisar y reparar la pared. Después, un sistema apropiado de enfoscado o regularización cementosa establece la superficie para impermeabilizar y alicatar.
Puede implicar más polvo, ruido, escombros y trabajo húmedo. Aporta una base nueva y control de la geometría. Se retira lo necesario, sin asumir que todas las paredes deben picarse por completo.
Preparar y colocar placas
Un sistema de placas adecuado permite crear un soporte plano y evitar la espera de un enfoscado convencional completo. Placa, espesor, apoyo y fijación deben responder a la pared y al peso del revestimiento.
Algunos sistemas salvan irregularidades con puntos nuevos de adhesivo y fijaciones mecánicas al soporte firme. No significa que cualquier placa pueda pegarse sobre pegotes antiguos.
Las placas añaden costes y remates, pueden reducir dimensiones y generan recortes. Juntas, esquinas, fijaciones y pasos de tuberías necesitan el tratamiento del sistema de impermeabilización. Una pared revestida con placas no es automáticamente una ducha impermeabilizada.
Placas aislantes y paredes frías
Algunas placas para alicatar tienen un núcleo aislante. Cuando procede, pueden combinar preparación y reducción de pérdidas por una pared exterior fría. Importan el espesor y las prestaciones: una placa fina no equivale a una capa importante de aislamiento.
El aislamiento interior exige estudiar construcción, humedad, condensación, encuentros y espacio perdido. Ayuda a conservar calor; no lo genera ni resuelve la causa de humedades. Un aislamiento de suelo adecuado también ayuda al funcionamiento del suelo radiante eléctrico.
Por qué varían los tiempos de espera
Fraguado, secado y estabilidad del soporte son etapas distintas. La siguiente capa se aplica cuando se cumplen las condiciones especificadas. Espesor, temperatura, humedad y ventilación influyen en el plazo.
Los morteros convencionales de cemento/cal necesitan maduración. Los productos rápidos pueden permitir avanzar antes, pero sus fichas distinguen entre estar listos para alicatar y para impermeabilizar. Seguimos el sistema completo, sin prometer el mismo secado para cualquier pared.
Las placas reducen trabajo de enfoscado, pero adhesivos, juntas e impermeabilización mantienen sus propios tiempos. Una superficie dura al tacto no demuestra que esté lista para cubrir.
Coste, residuos y solución acordada
Conservar material adecuado puede reducir demolición; retirar y enfoscar puede añadir escombros y mano de obra; las placas pueden ahorrar espera, pero añaden materiales y detalles. Ninguna opción es siempre la más barata o rápida.
En Morfohouse, explicamos preparación, gestión de residuos y plazos dentro de la reforma integral. Si aparecen daños imprevistos al desmontar, comentamos el trabajo adicional antes de proceder.
Preparación, impermeabilización y acabado
Buscamos un soporte firme, suficientemente plano y compatible antes del acabado decorativo. La impermeabilización de la ducha se resuelve como un sistema completo, incluidos esquinas y encuentros.
La documentación UNE pertinente aborda estabilidad, planeidad, cohesión, humedad y compatibilidad. No autoriza de forma general rellenar pegotes ni exige un único método para todos los baños.